
Write an Article
An article is a page that basically consists of inline ‘blocks ‘. These blocks can be text, images, lists, quotes, embeds, and many other things. Assuming you have already created your channel to which the article will be uploaded to, let ‘s get started:
Start an article page

On the Upload page, click ‘Write an Article ‘.

If you started an article earlier but did not publish it, it might appear on the side. You can continue writing that article by clicking on it; or feel free to start a brand new one.
The article body


Most articles on the site are written in the ‘Normal ‘ article width. At desktop browser widths there will be a margin on both sides, aligned with the voting bar.


A ‘Wide ‘ article will go to the edges of the browser window, as will most of the elements on the page such as the title, credits, share buttons and voting bar. The optional ‘Feature Image ‘ shown above the title will also be stretched to cover the width of the page. Notice how the width can affect the font size and text wrap properties.
As mentioned, articles consist of ‘blocks ‘. The ‘Article Width ‘ applies to all blocks in the article.

To add a new block, click ‘+ ‘.

You can choose between the various types of blocks: Heading, Text, Quote, List, Image, Embed, Separator, Table, and yes- even HTML code.

As you hover over and edit each block, you will notice that most of them have similar controls: Some formatting options, a positioning selector, and delete button. The positioning selector allows you to re-order that particular block, assuming you have multiple blocks. You can also grab the arrow and drag the block to change the order.

About the article
This part is fairly straightforward:
– Thumbnail: This should be square in dimension and the file size should be small- around 100KB is plenty for a good quality image.
– Title: This will appear on the thumbnail and the top (heading) of the article.
– Description: This will appear under the More Info drawer of the article; along with credits, viewing stats, publish date, and other metadata.
– Keywords: Good keywords will help with searchability, both on the site and with search engines such as Google or Yahoo. They can also help tie your article to related articles written by others. Use as many relevant terms that you can think of and keep the phrases short for maximum effect.
– Category: This helps in sorting related videos as well.
– Channel: Select what channel (participant) you want this article to appear under. Most people will have just one to select from- themselves.
About the article (optional)

There are some additional options that you can reveal by flipping the switch. The vast majority of articles do not use these options; so only use them if you feel they are necessary.

– Portrait Thumbnail: Most square (standard thumbnail) images look fine on the mobile app. However, you can put a different one here to insure that it will look good at the 2:3 aspect ratio displayed on the mobile app. This image will only be used on the mobile app.
– Subtitle: This will appear just below the title on your article thumbnail. Use this sparingly, as most people do not like reading thumbnails.
– Additional Credits: This will appear in the More Info drawer of the article, beneath the thumbnail credits. It is a free-form field, so you can type anything you want here. It will not display thumbnails.
– Content label: By default all articles will be classified as articles and show article thumbnails which are square (as opposed to the rectangular video ones). However, if you write an article where the main feature is a video (ex: YouTube embed), you may want to label it as a video so you can match the media with the expectations of the user. This is almost exclusively used in the case of a video posted in an article.
– Expanded Byline: You can place your thumbnail image and name in the article body. Text will automatically wrap around the expanded byline.You have the option of showing the Author Title or not.

Feature image (optional)

An image can be placed at the top of the article. The image should be wide since it will span the width of the article body. The width of this image can be displayed as either normal or wide, independent of the rest of the article. If you want to keep them the same (normal practice), you can select ‘Same as Body ‘.

Publishing
There are four options to select from after you have completed your article.
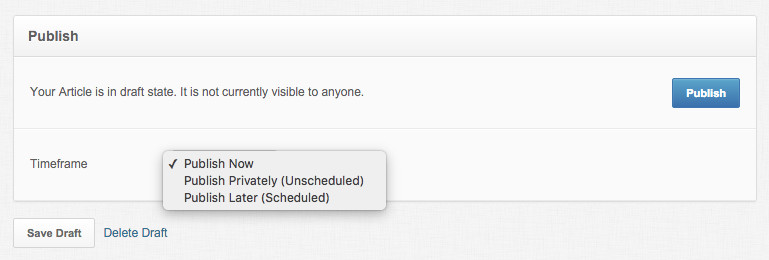
In order, starting with the most commonly used:
- Publish Now: Once you click this button your article will be publicly viewable. You can always edit the article after it has been published, and you can also permanently delete it.
- Publish Privately: This will save all of your changes, and only you will be able to view it on the site. When you are ready, you can then go back and publish the article.
- Publish Later: Upon selecting this option, enter a date and time at which you want the article to be made public. It will then automatically be published without further action.
- Save Draft: This will save what you have done, without requiring the mandatory fields (title, thumbnail, article body, etc.) for publishing. To continue working on a draft, locate the draft in the left column under ‘Uploads in Progress ‘ and click on it.


